Orchestrating Visual Studio Code : Part 5 : Unit Testing
2nd May 2018In this section, we will be automating unit tests with Visual Studio Code tasks.
XUnit
xUnit is a lightweight test framework that is very popular in the .NET community. It supports extensions for BDD with the xBehave library that can be very helpful in descibing tests with your Product Team as well as increased readability via syntax similar to Gherkin notation.
GitLens
GitLense is a Visual Studio Code plugin that gives insights into your underlying git repository (similar to CodeLens) as well as providing test run/debug links throughtout your code.
Your First Test
We will be creating a test project, adding the xUnit and xBehave NuGet packages, and wiring it up to a VSCode task so that we can run it from the IDE.
The Test Project
We are going to add a new top-level folder /test/UnitTests to hold your solution's tests. Navigate your shell to that folder and create a project.
mkdir -p test/UnitTests
cd test/UnitTests
dotnet new classlib
We need to switch the project from netstandard2.0 to netcoreapp2.0 to support the xunit dotnet cli integration. Change the following in UnitTests.csproj:
<PropertyGroup>
    <TargetFramework>netcoreapp2.0</TargetFramework>
</PropertyGroup>
Make sure to add the new test project to our solution. Run the following from the root of the project:
dotnet sln add test/UnitTests/UnitTests.csproj
Adding Test Packages
Within the ./test/UnitTests directoy, we will add xUnit...
dotnet add package xunit --version 2.3.1
dotnet add package xunit.runner.visualstudio --version 2.3.1
... and then add the xunit cli tool to the UnitTests.csproj:
<ItemGroup>
    <DotNetCliToolReference Include="dotnet-xunit" Version="2.3.1" />
</ItemGroup>
The OmniSharp extension we loaded earlier will prompt to
Restore Packages. This will pull the binaries down from NuGet into your local test project.
Creating a Smoke Test
We are going to create a simple smoke test for this example:
└── test
    └── UnitTests
        ├── SmokeTest.cs
        ├── UnitTests.csproj
using Xunit;

namespace UnitTests
{
    public class SmokeTest
    {
        [Fact]
        public void CanAssertTrue()
        {
            Assert.True(true, "Our first test!");
        }
    }
}
From time to time, OmniSharp will hang when loading new packages. If you aren't seeing intellisense, press F1 and select
Reload Window. This will reset the analysis engine.
The Unit Test Task
We are now going to add a new tasks to our .vcode/tasks.json file:
{
    "label": "unit-tests",
    "type": "shell",
    "group": {
        "kind": "test",
        "isDefault": true
    },
    "osx": {
        "command": "bash ./scripts/project-tasks.sh unitTests"
    },
    "presentation": {
        "echo": true,
        "reveal": "always",
        "focus": true,
        "panel": "dedicated"
    },
    "problemMatcher": [],
    "windows": {
        "command": ".\\scripts\\project-tasks.ps1 -UnitTests"
    }
}
The Unit Test Script
The task will call the unitTests() method in the scripts/project-tasks.sh file which iterates over the projects under the /test directory and executes dotnet test for folders with UnitTests in their name.
# #############################################################################
# Runs the unit tests.
#
unitTests () {

    echo -e "${GREEN}"
    echo -e "++++++++++++++++++++++++++++++++++++++++++++++++"
    echo -e "+ Running unit tests                            "
    echo -e "++++++++++++++++++++++++++++++++++++++++++++++++"
    echo -e "${RESTORE}"

    for dir in test/*UnitTests*/ ; do
        [ -e "$dir" ] || continue
        dir=${dir%*/}
        echo -e "Found tests in: test/${dir##*/}"
        cd $dir
        dotnet test
        rtn=$?
        if [ "$rtn" != "0" ]; then
            echo -e "${RED}An error occurred${RESTORE}"
            exit $rtn
        fi
    done

}
Running Your Tests
At this point, press F1 and run the task unit-tests. You should see the following output:
++++++++++++++++++++++++++++++++++++++++++++++++
+ Running unit tests
++++++++++++++++++++++++++++++++++++++++++++++++

Found: test/UnitTests
Build started, please wait...
Build completed.

Test run for /VSCode-Orchestration/test/UnitTests/bin/Debug/netcoreapp2.0/UnitTests.dll(.NETCoreApp,Version=v2.0)
Microsoft (R) Test Execution Command Line Tool Version 15.6.0-preview-20180109-01
Copyright (c) Microsoft Corporation.  All rights reserved.

Starting test execution, please wait...
[xUnit.net 00:00:00.6418600]   Discovering: UnitTests
[xUnit.net 00:00:00.7619690]   Discovered:  UnitTests
[xUnit.net 00:00:00.7693280]   Starting:    UnitTests
[xUnit.net 00:00:00.9738810]   Finished:    UnitTests

Total tests: 1. Passed: 1. Failed: 0. Skipped: 0.
Test Run Successful.
Test execution time: 2.0896 Seconds
Debugging Your Test
Installing GitLense
We will now load the GitLense extension to allow running and debugging individual tests. Open the extensions menu on the left panel and search for GitLense to install it.
Running and Debugging a single test
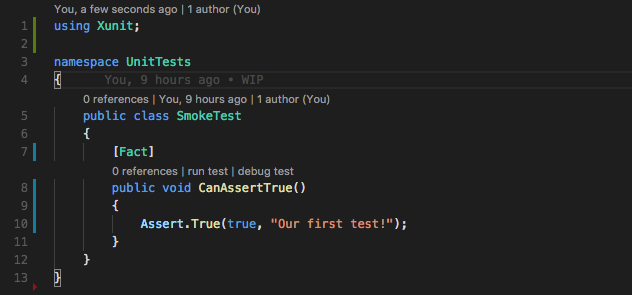
Once GitLense is loaded, you will see gray annotations above your classes and methods. If the method is a [Test], [Fact], [Scenario], or any other attribute designating a testable mehtod, you will see two options, run test and debug test.

GitLense also provides insights into your git repository blame logs. You can see what time and which team member last updated each line of code. This is very simlar to Visual Studio's CodeLense feature (but free!).
Conclusion
We learned how to wire-up multiple unit test projects to run within VS Code.
The Source Code
You can find the source code for this article in the following repository under the part-5-unit-testing branch:
https://github.com/christophla/VSCode-Orchestration/tree/part-5-unit-testing
Next Post : Code Coverage
In the next post we will learn how to add code coverage reports to our test runs with gulp and lcov.
Previous Post : Running Docker Containers
https://christophertown.com/orchestrating-vscode-running-docker-containers


View Comments